Stitching
Stitch the panels together and get your first look at the boat's shape.
 |
| Stitch the stem first |
Coat the wires with floor wax (so they can be easily pulled after the epoxy cures) and stitch 'er up!
 |
| Then install and stitch the bottom panel |
Until, now, this project has been progressing fast - working with big slabs of plywood, laying large sheets of fiberglass, spreading cups of epoxy and quick cutting. Stitching is the first slow hand work and it takes patience. Calm be Luke Skywalker.
 |
| Stitching the chine |
 |
| Stitching the transom |
CAUTION: THE ENDS OF THE CUT WIRES ARE RAZOR SHARP. LEATHER GLOVES WILL HELP IF THEY PROVIDE THE NEEDED DEXTERITY. THINK ABOUT AND EXPERIMENT WITH YOUR HAND MOTIONS. CONSIDER WHETHER TO PROGRESS FROM LEFT TO RIGHT OR RIGHT TO LEFT ALONG THE BOAT. THIS WILL SAVE A LOT OF BLOOD. KEEP BAND AIDS AND MEDICAL TAPE HANDY.
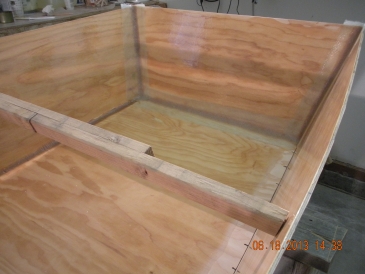
What was yesterday a bunch of flat panels, is today a 3D boat!!!


Turn the boat over and install the spreaders. The locations and lengths of the spreaders are specified in the plans. Then tighten the stitches to get the final hull shape.


TIP: AFTER TIGHTENING THE STITCHES, BEND THOSE SHARP LITTLE BUGGERS SO THAT THEY WON'T JUMP OUT AND CUT YOU.
Gluing
Time to start working on the inside of the boat. I was waiting on my clear epoxy hardener to arrive so I did things a little out of order by installing the riblets before taping the interior.
 |
| Riblets clamped for gluing |
To tape the interior, pre-coat the fillet and tape area with un-thickened epoxy/hardener for a good bond to the wood. Then fillet the stitched joints with a mixture of epoxy, hardener, silica and wood flour that looks like peanut butter but doesn't taste as good.
 |
| Fillet in the chine |
Then tape the fillets, with biaxial fiberglass tape, saturated with epoxy/hardener. If you wait until the fillet cures, you have to painstakingly sand it. Otherwise, tape over the soft un-cured fillet and save the sanding for later.
Cut the tape longer than needed. Where it sticks out past the boat you can try to cut the excess off before the epoxy cures and make a mess. Or, let the epoxy cure and cut the excess away in the dry.
 |
| Fillet and tape completed |
After the epoxy/tape cures, I take a Surform and knock off the bumps in the tape/epoxy. Then I apply one or two coats of unthickened epoxy to the tape.

TIP: SURFORMS ARE GREAT FOR KNOCKING OFF THE HIGH SPOTS OF EPOXY BUT THEY TEND TO CAUSE COLLATERAL DAMAGE TO SURROUNDING AREAS. WITH EPOXY THIS IS OK SINCE WHEN RECOATING THE AREA, A DAB OF EPOXY WILL REPAIR THE DAMAGE. HOWEVER, THIS IS NOT SO WITH UNCOATED WOOD. DON'T USE SURFORMS AROUND UNCOATED WOOD OR YOU WILL BE SANDING THE DAMAGE OUT OF THE SURROUNDING WOOD.
No comments:
Post a Comment
Note: Only a member of this blog may post a comment.